


App Usage
1.Download and install
1.1 Download BalanX APP on Apple Store Or Google Play.
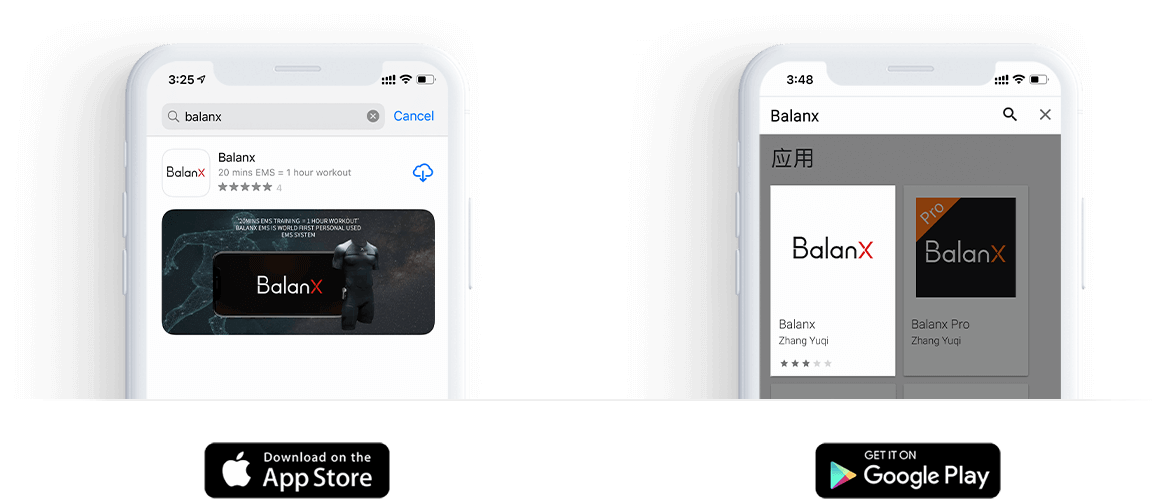
1.2. Open the BalanX APP on your Phone/Tablet
2.User management
2-1. Click the menu  will come out a white page,Click the user avatar again.
will come out a white page,Click the user avatar again. 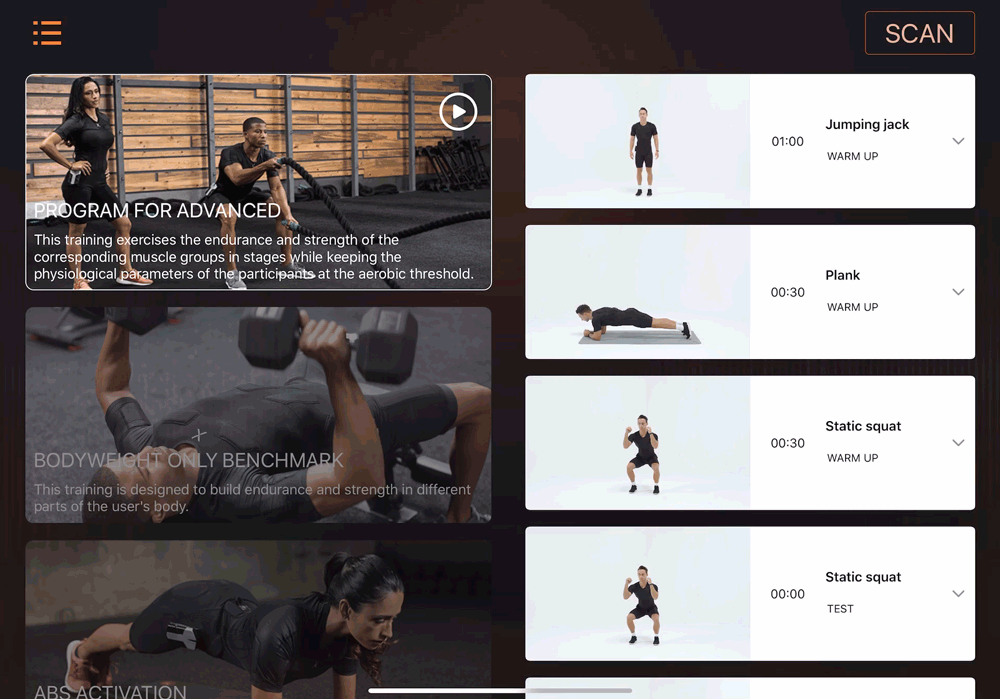
2-2. Click on New user.

2-3. Enter your personal information, click “Create”.
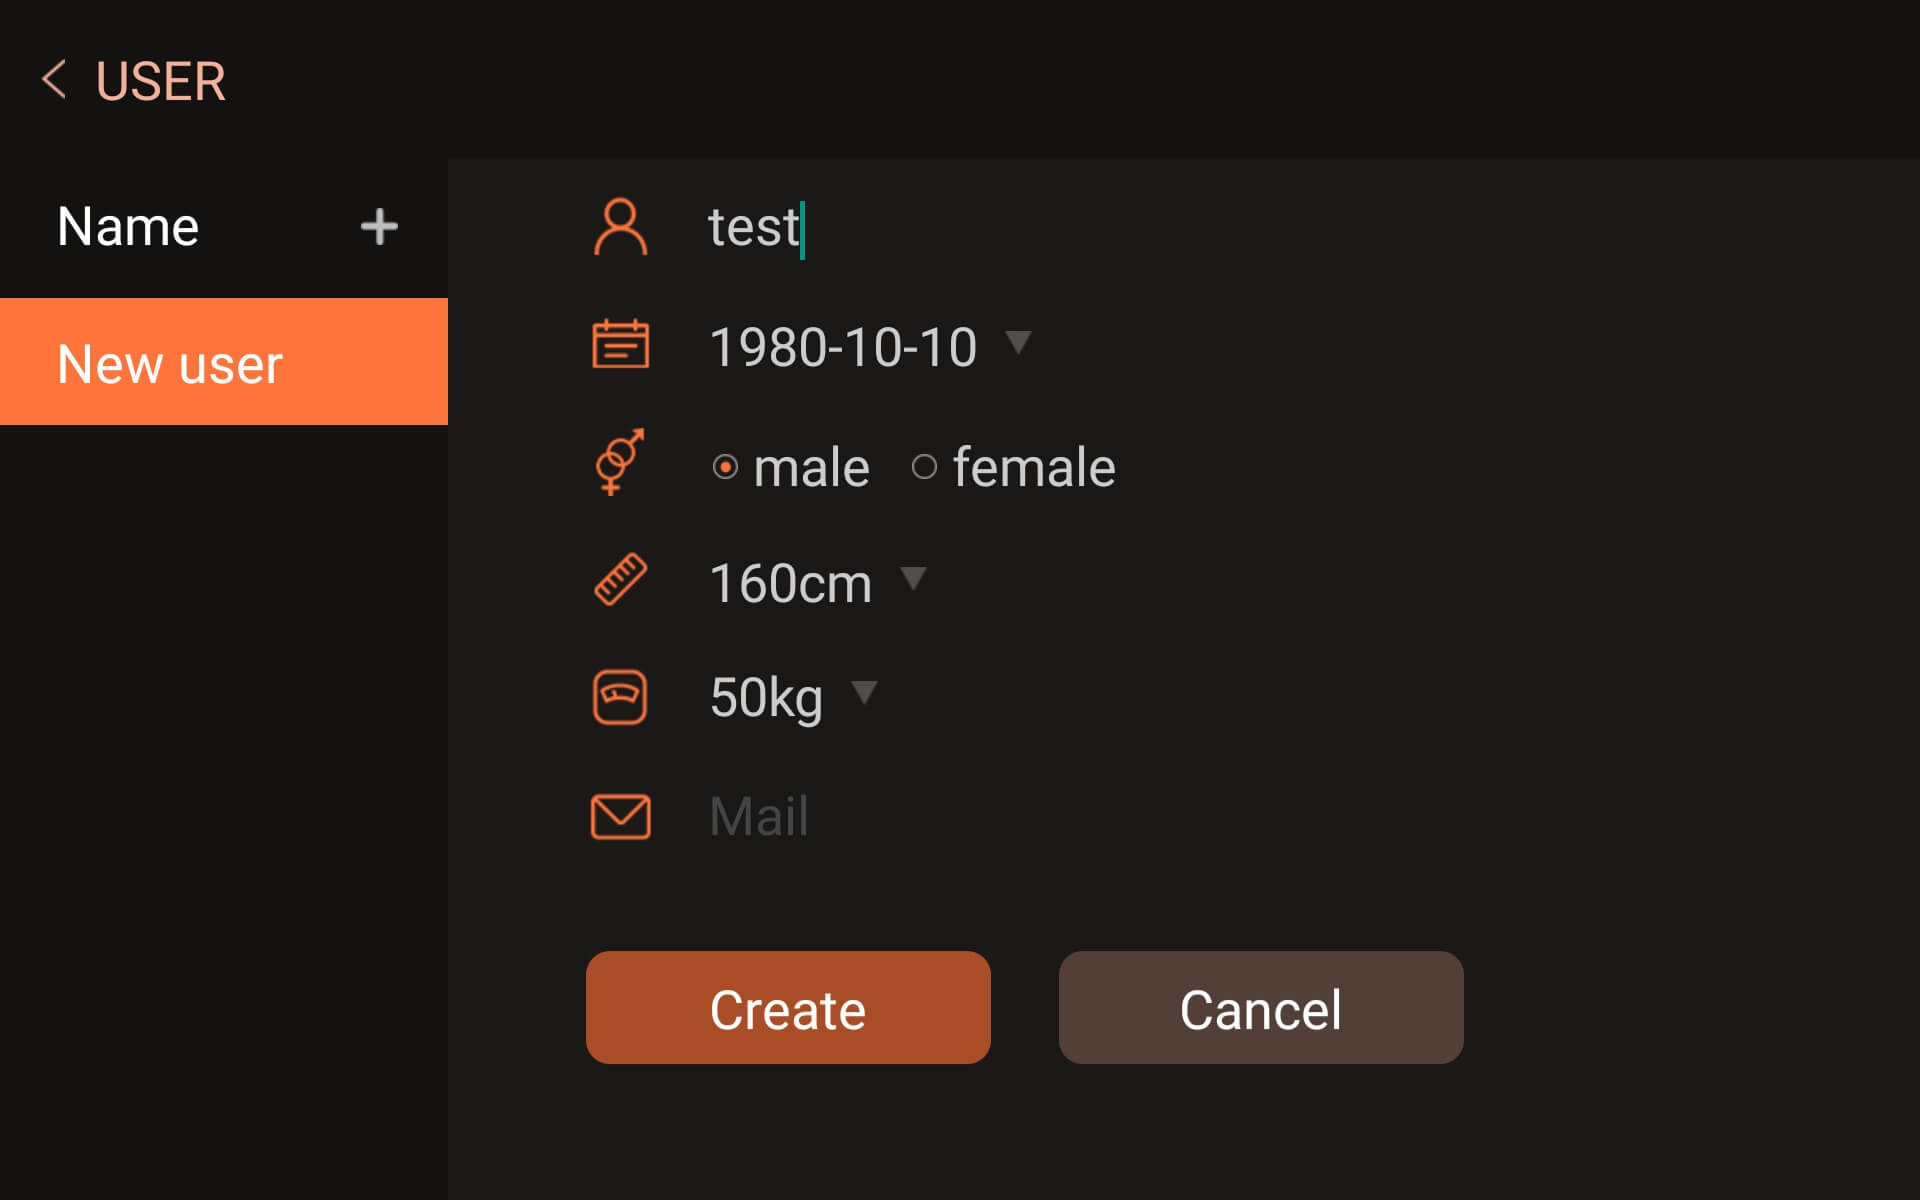
2-4. Personal user account (group training can add new user).
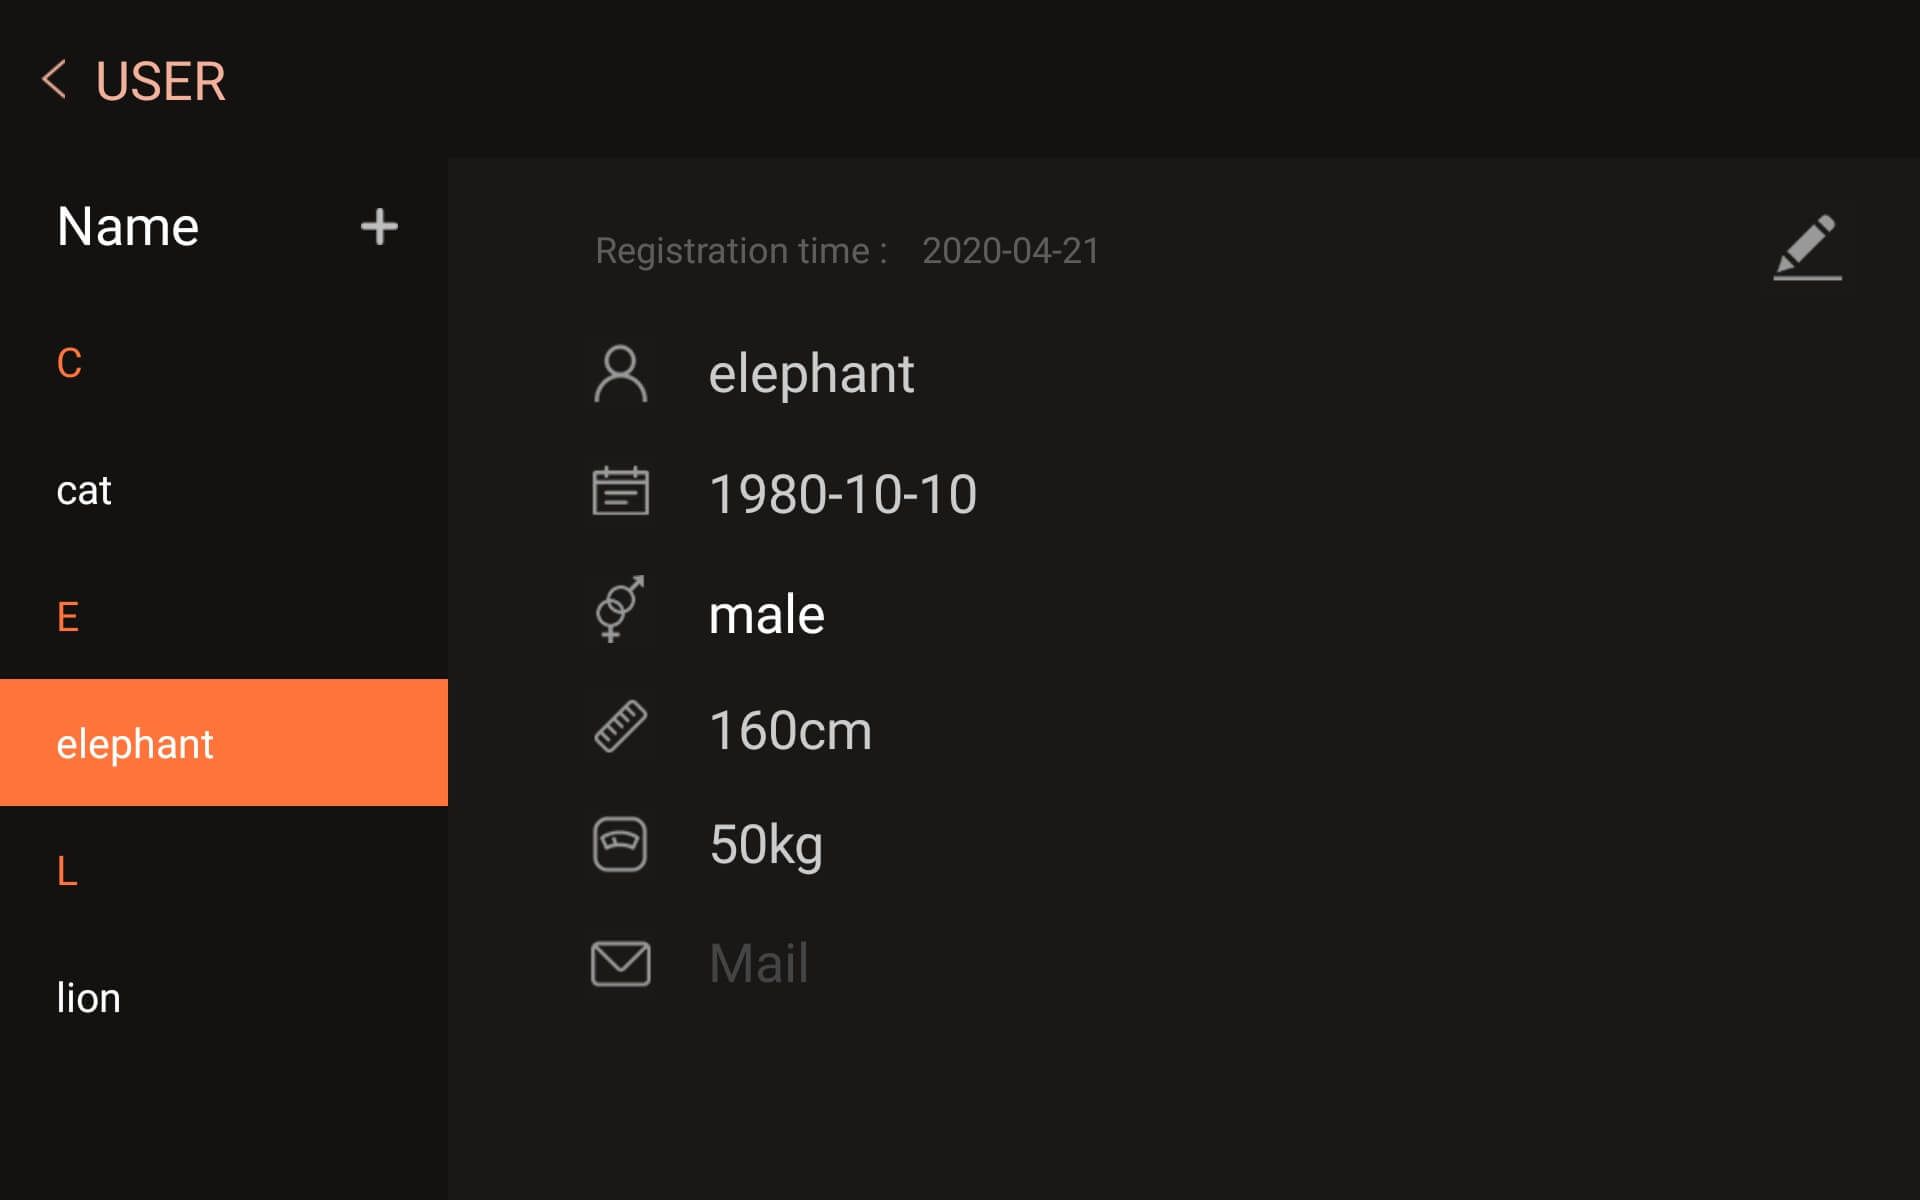
2-5. After created user account, go back to the Home
page.
3.Open and connect the hub
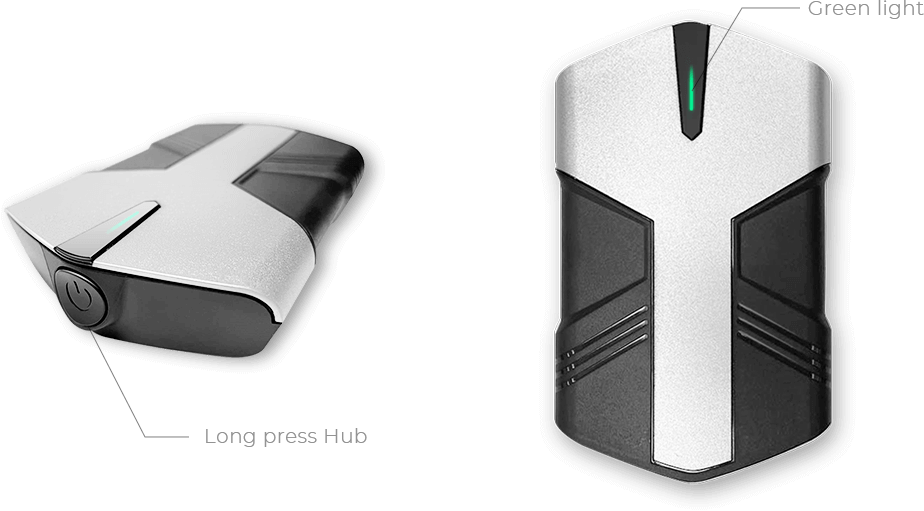
3-1. Long press the HUB,the HUB turns green light.
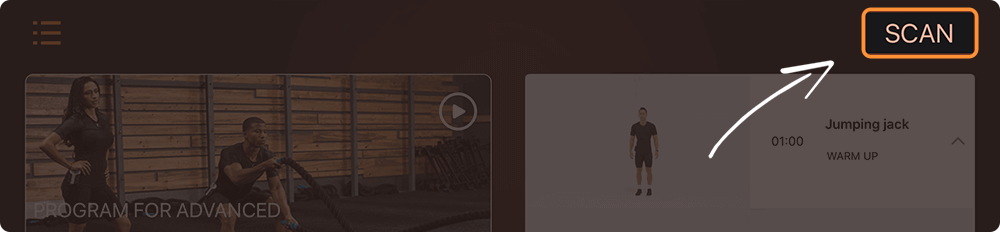
3-2. Click "SCAN" on the upper right corner of the home page
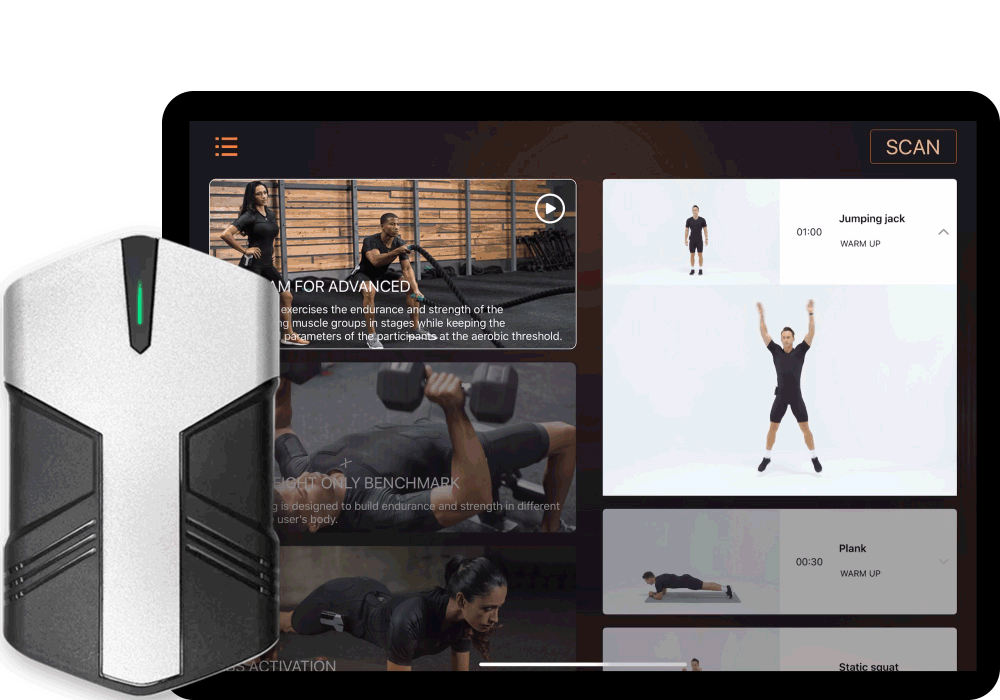
3-3. Click the name of the Bluetooth you want to connect
to,after the device is connected,the indicator light will turn from green to blue,and the
name of the device will turn orange.
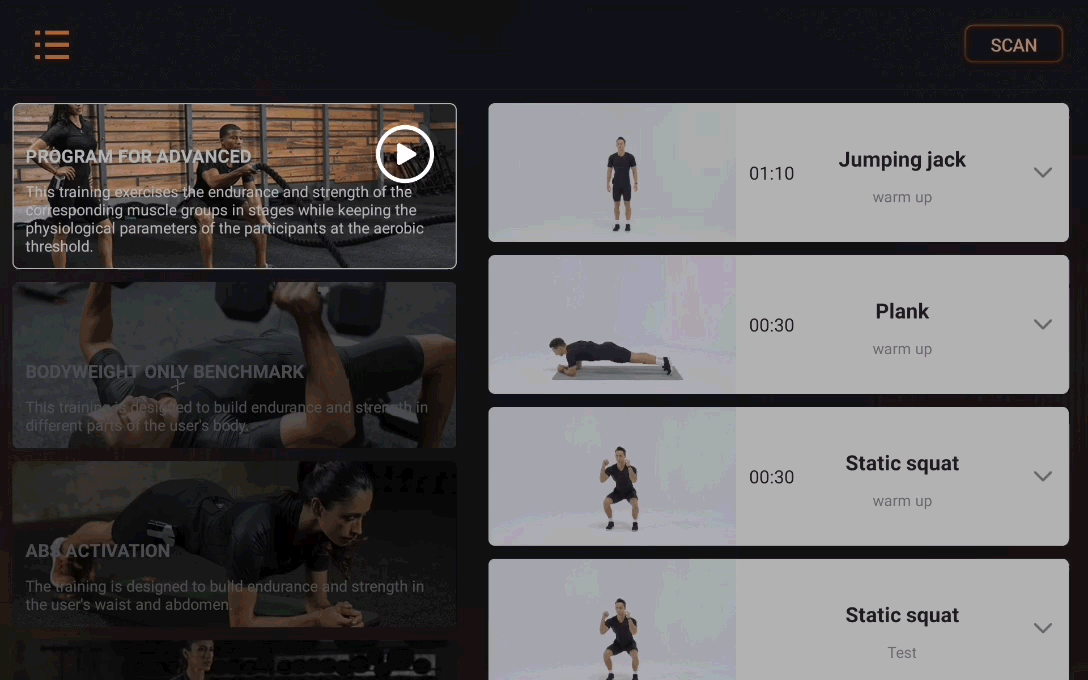
4.Select a training scheme
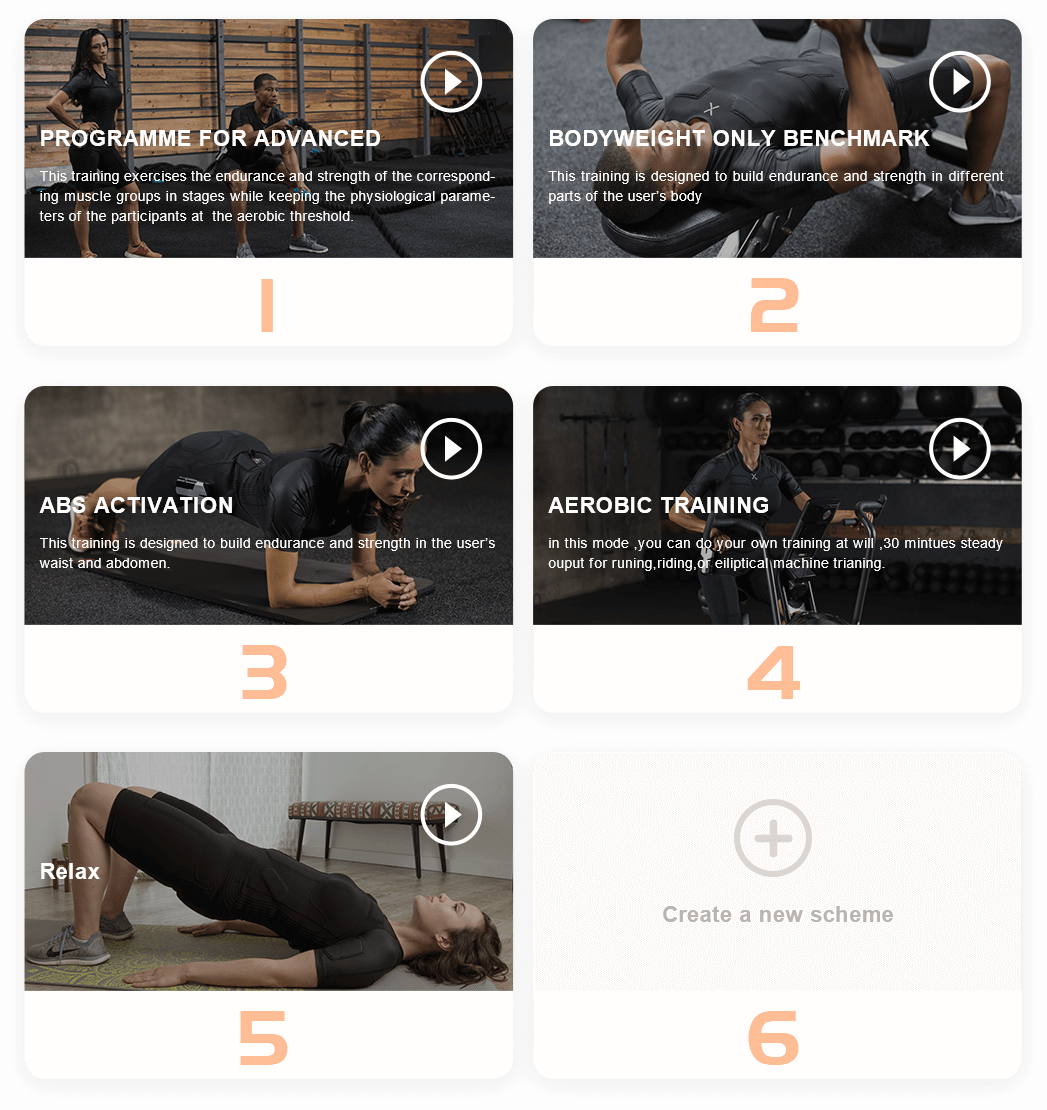
Back to Home page,Choose any mode or you can Create your own scheme.
*Most of the schemes need to download videos for your reference
exercise,please ensure to the smart phone or tablet connect with internet and wait the
downloading.
Users can choose the right courses for training according to
their own needs.
Now we provide:
'PROGRAMME FOR ADVANCED'
'BODYWEIGHT ONLY BENCHMARK'
'ABS ACTIVATION'
'REPEAT TRAINING'
(More video training are on the way)
'AEROBIC TRAINING'
and 'RELAX'
Advanced users can also 'create new scheme' according to your
own needs.Here's how to find your first settings in 'Create a new scheme'
5.Enter a scheme and adjust intensity
For example,choose the program for Advanced.
5-1.Click the button at the right of the scheme info bar
5-2.Enter into control panel page,you could choose the different
muscle groups which you want to training.
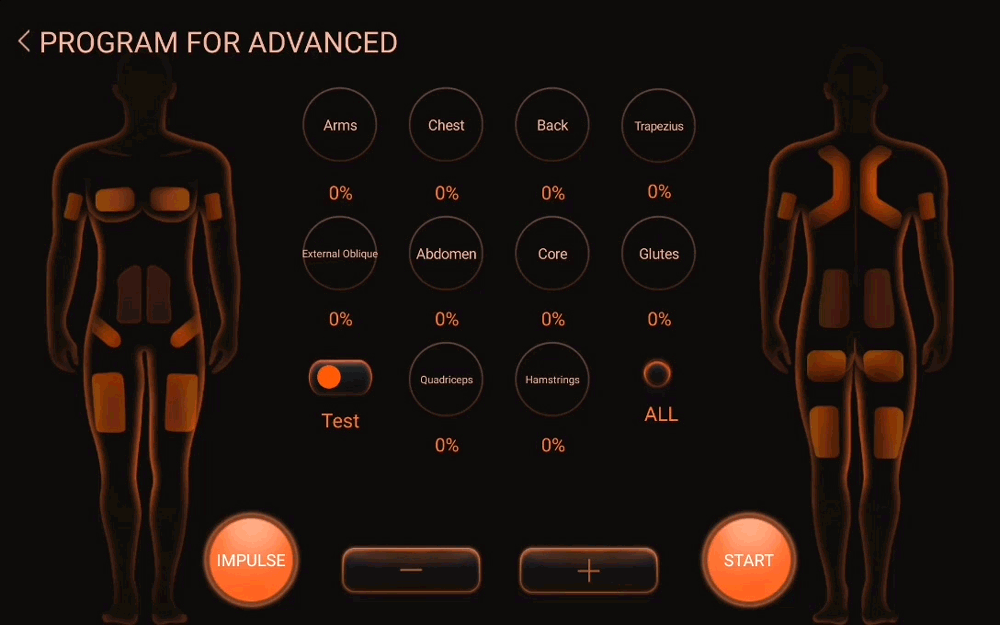
5-2.Enter into control panel page,you could choose the different
muscle groups which you want to training.
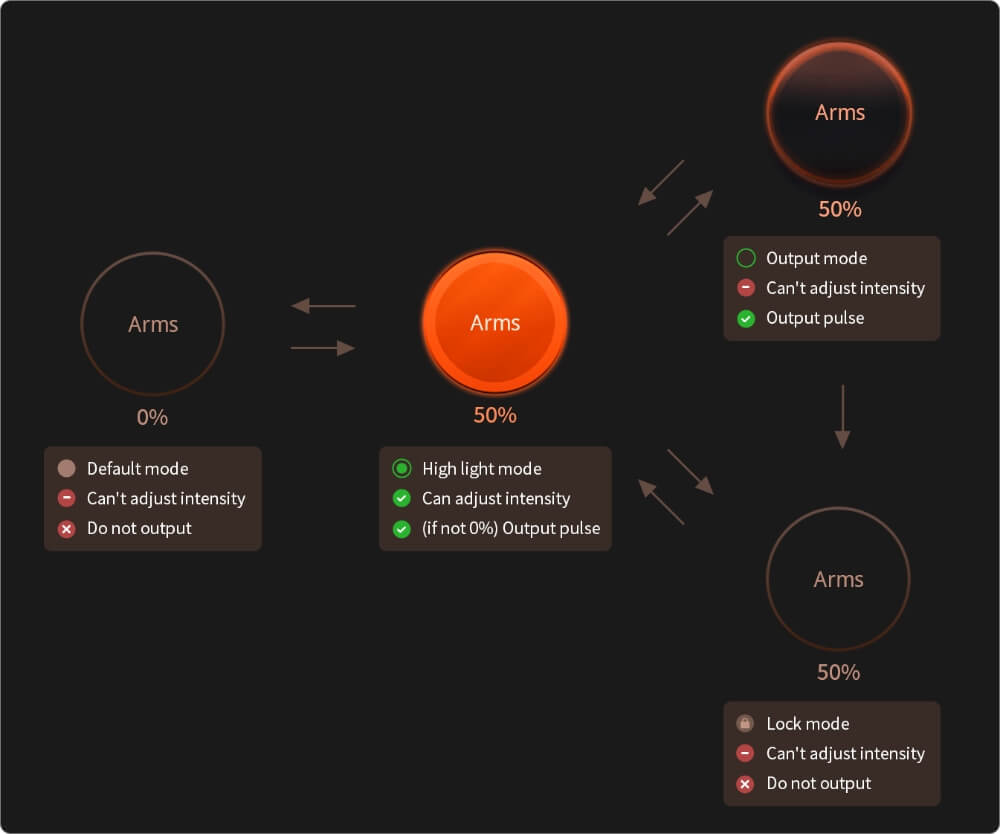
It has 4 statuses for the electrode buttons.
(1).Default mode:Intensity = 0;No output;Under this status,you
can not adjust the intensity of that electrode.
(2).High light mode:Click electrode button once from Default
mode/Output mode,then the electrode button will turn into high light mode.You can adjust the
intensity under this mode.
(3).Output mode:To go into this mode,click electrode button
once from high mode if the intensity is not equal to 0.
(4).Lock mode:In some software version(Android not iOS yet),it
has one more mode.Long press electrode button from High light/Output mode will
turn this mode,which will not output no matter how much the intensity is.This mode is for
the training just for isolation.
Above all,if the electrode buttons is not locked and have
intensity(more that zero),it will have output!
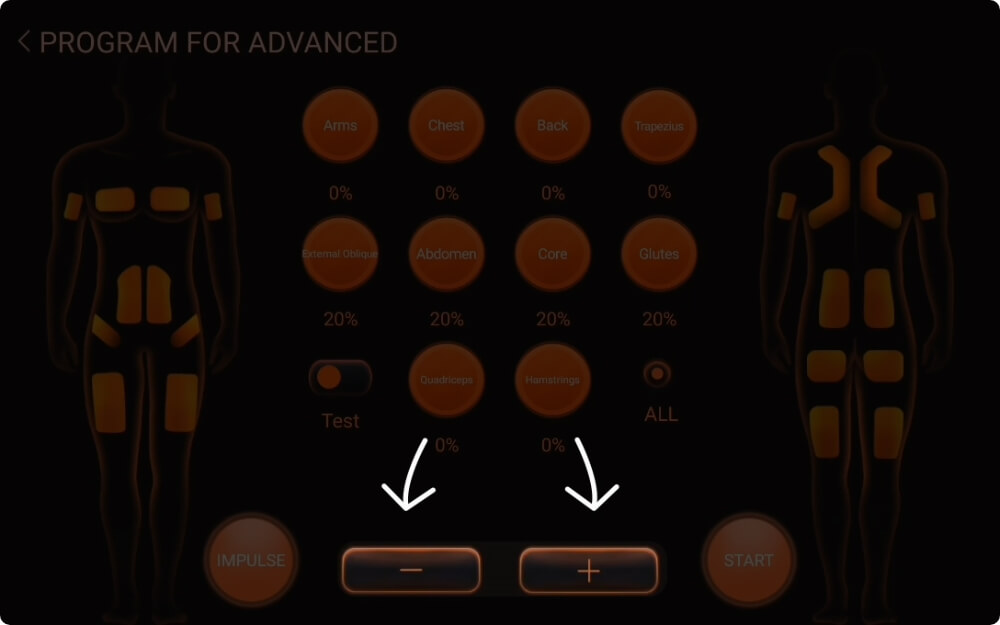
5-3.Press 'All' can see the all buttons turn in orange.
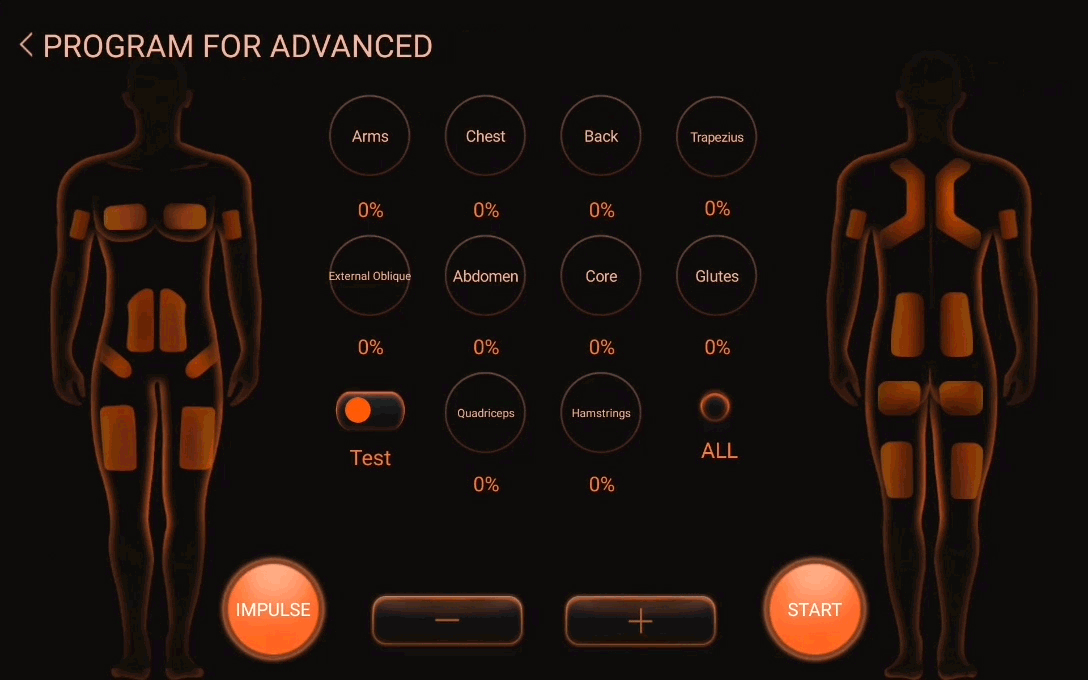
5-4.Press '+' & '-' to adjust the intensity
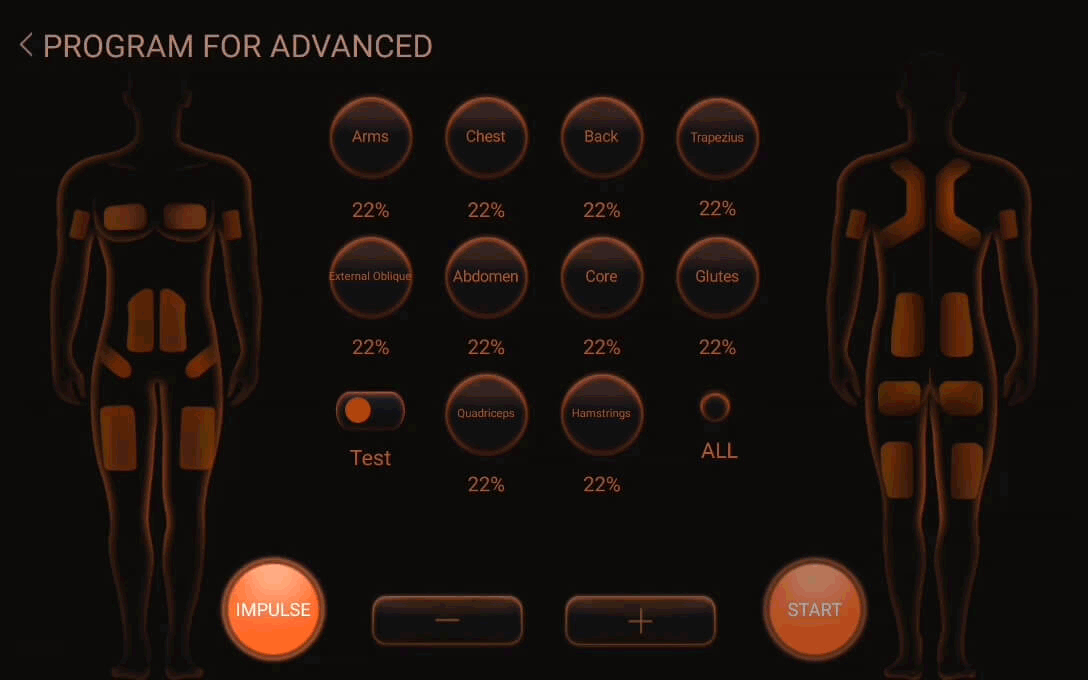
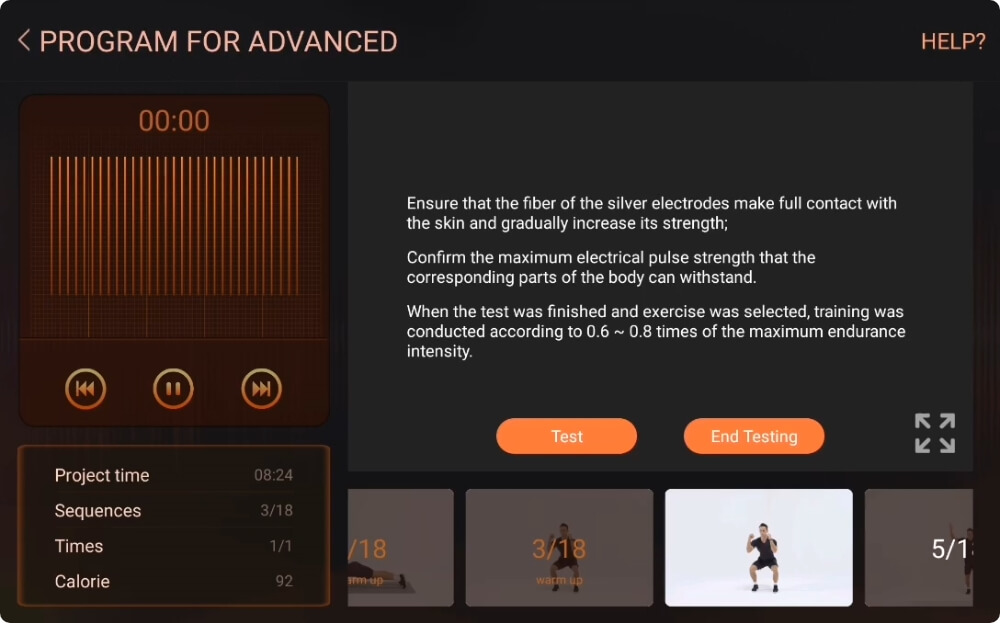
5-5.TEST mode
Click TEST,the device
will start output pulse.
At this point, you can feel the current in the area through the intensity setting. Adjust
the intensity until the output of every electrodes are properly*
*The proper intensity are vary from people. One principle you can follow is: do not let the
electrical stimulation affect your movement, if you can not move, it is not a training, and
you can not trigger that muscle involved into that movement.
Important Note: The gap between the intensity of each electrode pad should not exceed 20%.
5-6.More tips
*It is recommended to adjust the intensity from the lowest level and gradually increase the
intensity. Do not adjust the intensity too high for the first time.
*The part far from brain will need higher intensity setting, for example: lower limbs are
set 5% higher than core, and upper limbs may set 5% lower than the core.
*if you have open wounds or irritated skin anywhere on your body, set the corresponding
electrode to 0%(or locked), as this could be very uncomfortable
6.Set IMPULSE
Tap IMPULSE on the control panel page for setting parameters of
scheme.
IMPULSE setting page
6-1.SEQUENCES
For setting how many training sequence of this scheme,and which
sequence is set.

Tap in the middle of this box, then it will show a drop-down
numbers. Choose how many sequences you want in this schemes.(For example, 2 in this demo)
Now it show the parameter of first sequence. It is a ‘Impusle’ mode training, with 12 time
repeat.

If you want to set 2nd sequence, you can tap the ‘+’ on the left of
this box. then you can set the 2nd sequence parameter, it is a ‘Steady’ mode with duration of
120s.
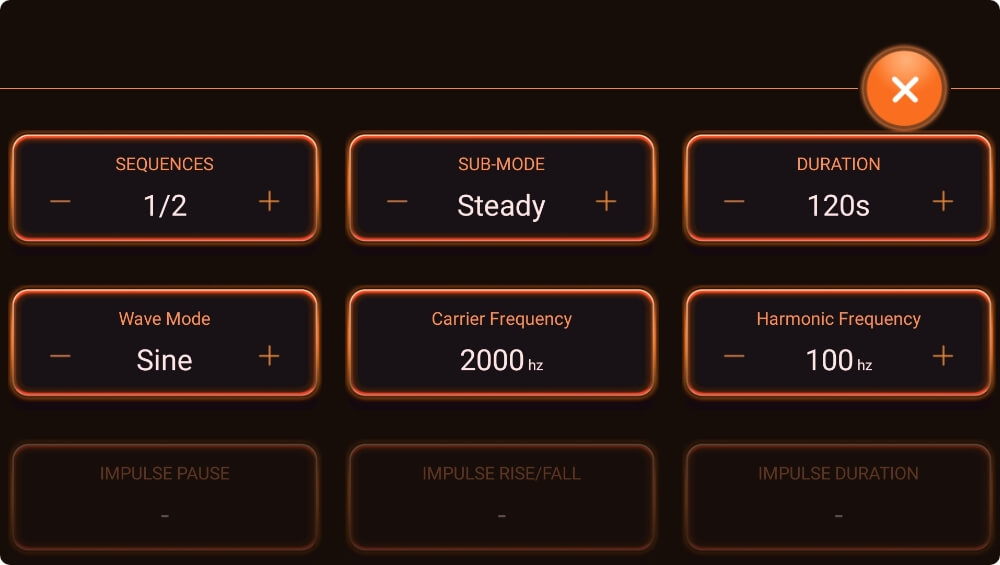
6-2.SUB-MODE
There are two sub-mode now. One is STEADY mode, another is IMPUSE
mode.
STEADY: Under this mode, output current is continuous. The mode if for training with a long
period of consistent movement (such as running, circling)
IMPULSE: This mode is the patented technology of BalanX, which realizes the waveform slow
intensity modulation during the different phase of one training. This mode is for trainer like
Yoga or Pilate, which is more emphasis on the flow of breath and movement. The IMPUSLE mode can
have a time for rest(breath in), then the stimulation ramp up with IMPULSE RISE time, hold the
maximum output with the IMPULSE DURATION time, after that, is the ramp down with IMPULSE FALL
time.
6-3.Duration/Times
DURATION: It is the time for one STEADY mode training. Usually it
range from 10s~30mins.
TIMES: It is the repeated times of IMPULSE mode.
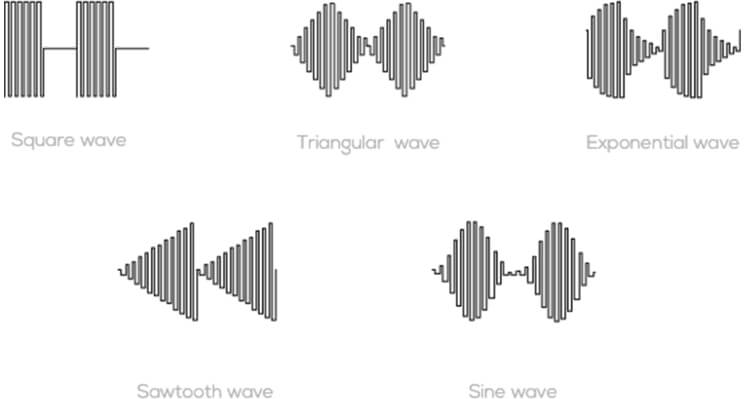
6-4.Waveform
BalanX EMS has 5 different wave form. They are square wave, sine
wave, triangle wave, saw wave, exponential wave. Different waveform have tiny feeling
difference. It is very useful when nerve system is get used to one of the waveform, then
changing to another waveform will keep the strong feeling of that intensity.
6-5.Carrier Frequency
BalanX EMS is world 1st medium frequency pulse modulate low
frequency waveform Whole Body EMS. Which means it has the same ability as other medium frequency
EMS to reach deeper muscle group. And its medium frequency pulse now fixed at 2000Hz.
6-6.Harmonic Frequency
BalanX EMS is world 1st medium frequency pulse modulate low
frequency waveform Whole Body EMS. Which means it has the variety feeling as other low frequency
EMS. You can choose the harmonic frequency range from 5Hz~120Hz.
6-7.IMPULSE PAUSE(time)
For IMPUSLE mode, this parameter is the time without output any
stimulation.
6-8.IMPULSE RISE/FALL(time)
For IMPUSLE mode, this is the ramp-up and fall-down time of
intensity.
6-9. IMPUSLE DURATION(time)
For IMPUSLE mode, this parameter is the time with maximum output
stimulation.
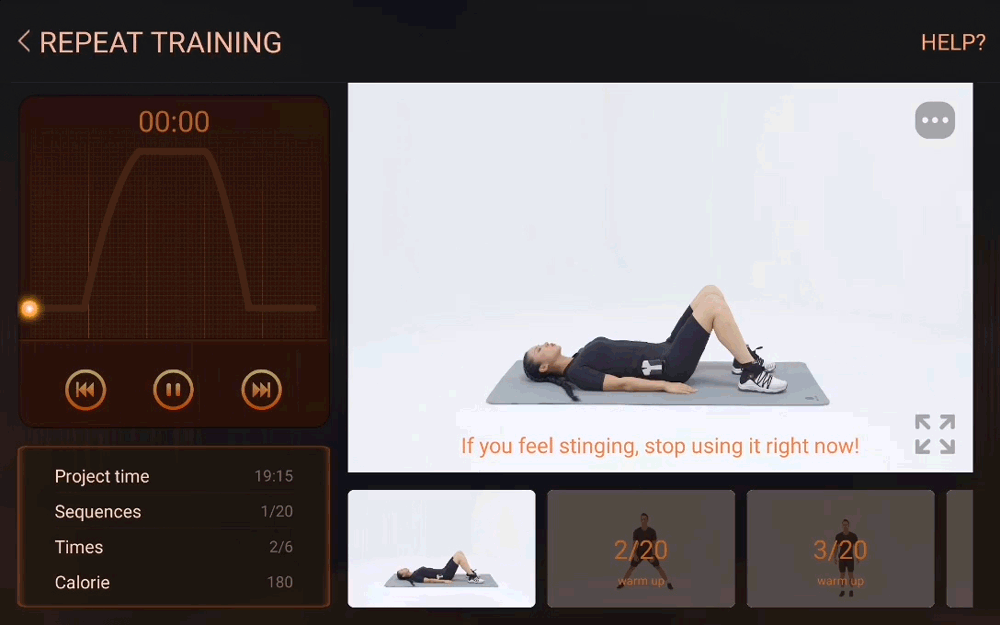
7.Start training
Everything set up, press “START” button to begin your exercise.
7-1.Warm up
The first 3 sequences are warm up training in some training
schemes. Warm-up is necessary. It can prevent injury during training, and also it make the
silver fabric wet by sweat, which will improve the connection of skin-electrode interface.
[In warm-up mode, there are generally several warm-ups in the front,
and no pulse is output in the warm-up state. Because we found that the electrode coating is not
easy to contact the human body surface in a dry environment, we have added a warm-up step, on
the one hand, for better Stretch the muscles to prevent injuries. On the other hand, it is also
hoped that the user can sweat slightly, so that the electrode clothing is in closer contact with
the human skin.]
Then a sequence with a TEST button come out for testing if you are
ready for EMS training. If the electrode is wet enough, you can go on training (press End
Testing). If you are not prepared, warm up again or spay some water on the surface of
electrodes.
Note:
*If you find the intensity is very low, or you can’t feel it
all:
—check the green light is flashing on the hub
—check the hub is firmly connected to the connector in the base
—warm up your body to get a little sweat going
—spray water on the electrodes
—check the intensity settings; sensitivity varies from person to person, but most people will not feel much below 20%.
*If you feel a strong tingling sensation:
—reduce the intensity or turn off the power in the corresponding part
—check whether there is an open wound in that area of your skin.
If you feel very uncomfortable or ill:
—stop using your suit immediately
—wait until you’re fully rested before using the suit again
7-2.During training
We recommend training for between 20-30 minutes.
You can use any of the gym equipment you normally use, or take part in aerobics, yoga, Pilates
or other gym courses or customized training plans.
—Start slow with low weights before you do get use to the suit and the pulse. The suit will do the extra stimulation of muscles.
—We recommend you do the self-weight training, more plans will also come up soon.
—Start slow with low weights before you do get use to the suit and the pulse. The suit will do the extra stimulation of muscles.
—We recommend you do the self-weight training, more plans will also come up soon.
7-3.After Training
Turn off the power.
Wash the suit immediately, following the cleaning instructions below.
If you follow the instructions carefully, you can use the suit 400 times, and the battery in the
hub can be used 500 times. If you use the suit twice a week, that works out at over 8 years of
life for the suit, and over 10 years of life for the hub!
Pay attention to your diet, and your intake of protein and vitamins. Also pay attention to rest
and hydration.
Soreness after training is normal—muscle buildup occurs when muscle is torn during training. You
should avoid driving for long periods of time or engaging in dangerous physical activity.
